Sunday, June 27, 2010

Di's Digi Downloads and Mens' Cards

Just a few more to show you as promised, after the first one I made with Di's Downloads - these images are PERFECT for men's themed cards and I loved colouring them - to check out Di's artwork pop over to her blog here and you will be delighted with the images.

the first couple I printed and coloured in with twinkling H2O's after heat setting them:

here is some detail on the beer mug - I used the liquid applique stuff which I applied the heat gun to and it makes nice 'beer'!


the last one I coloured using the OMS pencil technique with sansador and gives a really soft finish.. the paper was downloads from Bearly Mine Designs (just plaid set)- see the link over on the right hand side on the blog

Friday, June 25, 2010

some old favourites

now and again I like to go through some old decoupage sheets and images and see what I can come up with. I had no baby cards left so I thought mm fancy geting out the margaret sherry sheets I had bought ages ago and some scissors, and here are my efforts so far..
the sheets were bought such a long time ago I am not sure where from but most craft decoupage stockists have them.
the bundle of love buttons were from a pack of Dress it Up buttons
the oval frames were made with nestabilities


Wednesday, June 23, 2010

A couple of cards for men...

I have been in a making-cards-for-men mood so here are a couple and more will follow:

the first is from a digi image from Di's Digi Downloads and can be found here - I have some more of these images made into cards which will be finished this week so check the blog as will be posting them when they're done too.
this little bear was coloured with pencils - faber castell ploychromos pencils - used the OMS (odourless mineral spirits / sansador) technique and I think thats my newest favourtie thing at the moment, just waiting for some blending stumps to arrive in the local art shop now!! (did this one with cotton buds - had to improvise as you do)
hop over to Di's Digi Downloads - the digi stamps for men are really good and there are quite a few different ones too


the second card is similar to one you may have seen on the blog already a few months ago and its using the stamp man aspects of design - nautical stamps which come in a whole A4 sheet with at least 4 stamps on it.
this time instead of use the hero arts text background stamp for the background I used the text stamp from the stamp man set and its just perfect!
...also learned how to tie a sailors knot (thats for suggesting that Anne from the workshops a while back - managed it!!)
the background is stamped in midnight (navy colour) stazon ink before being distressed with tim holtz ink pad and the efect is because I used hammer embossed card


thats it for today - off to make some more masculine cards while the inspiration for them is still there ..

Monday, June 21, 2010

Masking and stamping with Stazon


just a quick one to share with you - I love stazon ink for lots of reasons and when I bought some of the coloured ones (other than greys, black and brown that is!), I thought I had made a mistake.. I am using them more now than some of the dye inks in my stash since the stazon ones have such vibrant shades (not many shades but the ones they have go well with almost anything).
My fave way to use these inks is to apply more than one pad to the stamp before stamping onto the card - apply light colours first as the inks WILL mix - and for this one I used the Iris and Vibrant Violet shades for the tropical flowers ...

The larger flower was stamped first, then again on scrap piece of paper and cut out for the purposes of masking the first/main image then stamp the smaller flower...
then stamped the stem and lastly the leaves (these were done with various shades of color box chalk inks again applied DTR and then stamped onto the card)
the stamps can be bought here


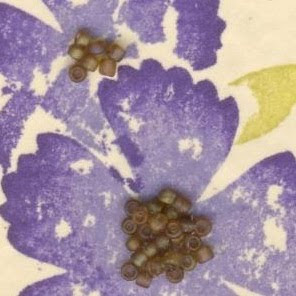
One little idea that sprung to mind, was to use my seed beads and since I only had a light sandy colour or black (any other ones except the shade I wanted... always a problem!!...), I coloured them with the pebble shade of Tim Holtz alcohol inks, and they same up nice and brown.

The seed beads were stuck on using Art Institute Glitter Glue - my staple craft supply item as it sticks almost everything!!
here is a close up:

PS I will be using seed beads in my July Workshop - we wont be making this same card but will be using seed beads to embellish something along these lines...

Here are a couple of variations on the card above - sometimes when I make one I like to make a couple more if I like the end result on the first one, but instinct is I cant make them the same, I have to try and alter the layouts etc!!

Saturday, June 19, 2010

Rock Star on a Mission

odd title I know - my mission is to start using some of the stamps and stash I have in the cupboard, before being tempted to buy anymore!.. and I wanted to create a card with deep colours as well as use and enter a sketch challenge, so here it is:
the stamp is a sugar nellie one called rock star available from funky kits and the shapes are nestabilities labels and star dies. The star border is using a punch I bought from ebay with no brand name on it, but one of the cheaper ones, and I like the border it makes, which is great for party type or mens' cards.
and some detail so you can see the gold brilliance pigmnent ink used to dist6ress edges of the marron cardstock - the teal cardstock was from craft creations and is very vibrant, I can recommend it for card stock as its a heavy weight, as well as layering.

Friday, June 18, 2010

Sleepy Bee Flower Shaped card


I joined a swap again this month and the challenge was to make and send a card that is shaped (not the norm) so it could be a boot, teapot, butterfly etc. I had the idea to dust off my robo again and make a flower shaped card and I wanted it to be mostly white and very fresh looking, so I hope this fits the bill.

The digi image is from the Digi Stamp Boutique's April Freebie which I have only got around to using now, and I am sure it will be available in the shop to buy.
UPDATE - this is still available as a freebie to download here.

I created the flower shape with the robo, and then flipped a copy of it before welding them together so that the back is the same as the front and then cut circles with nestabilities and stuck the circle with the image on with foam pads so it had some depth.

The image was coloured with twinkling H2O's as was the background and I managed this by not using too much water and heatsetting the image with a heat gun after printing it.
all finished off with stickles glitter glue and some black and white checked ribbon

Wednesday, June 16, 2010

Fiskars Threading Water Punch

.. okay its been driving me nuts since I bought this punch, that it would be gorgeous to make corners with it and had half attempted to do the corners and then ended up putting everything in the bin
...so I looked at youtube again and found videos showing how to match up the corners but getting around the whole page seemed to be the problem!!

http://www.youtube.com/watch?v=DV4Z1xjHOPA&feature=related
http://www.youtube.com/watch?v=K95RbikMds8

these are the videos you can watch for matching up the guidelines on the punch and then I took it a step further by measuing bits of paper and the punch and came up with these.

the following samples are made by punching tghe length of the border ONCE only to avoid tearing and roughing up the paper or card, the only bits punched TWICE are the corner holes which you could also line up / check alignment by slipping the paper in and lining up by looking through the back.

Anyway, here are my samples and the measurements on the punched pieces are the measurements BEFORE you start punching from the corner points and using the guides on the punch.
HINT: make very sure you measure with a good ruler and a fine pencil so you measure the milimetres correctly - every little mm makes the difference!

I hope this tutorial is helpful and the explanation good to follow, and would LOVE to know if you found it successful too.
Please leave me a comment if it worked for you or if you have any resources or guidlines for making corners with this punch.

Tuesday, June 15, 2010

Changito and a Challenge for Making it with Meslyn

Seeing as its fathers day this month and I couldnt wait to use this Changito Stamp I got a while ago, I thought I could combine it with this month's mid month challenge.
pop over and enter a link to your card / project here on the challenge blog.


I made a square joy fold card, and there are other tutorials on you tube and craft sites / forums, but I have done another here so the card fits nicely into a standard square envelope and the diamond shape fits nicely too.


the diamond shape as a topper makes in quiet interesting and still allows the closure thing to work well.

the sentiment closure is optional, you dont need to add it but its nice to tuck the smaller folded shape into the base flap so it doesnt fall open!

here's the card

and here's how it all came together..

cut two pieces of card as follows and score as follows:
for the base card size is 7.75'' x 5.5'' then score at 5.5''
for the inner piece card size is 7'' x 3.5'' then score at 3.5''

you should end up with this:
SO, the larger / base piece is basically a square with a flap, the square measures 5.5'' x5.5'' and the flap will measure 2.25'' x 5.5'' and the flap folds over and covers HALF the size of the square base ...the inner piece folds exactly in half and measures 3.5'' x 3.5''
and this what they look like together
decorate the outer and inner flaps as much or as little as you like. this is the view of the insides of the inner and outer flaps - I left one side white for a message / sentiment on the inner flap and inked only the edges of the white side

more views of outside of the decorated flaps

to finish: glue the inside flap down onto the square paper covered base, taking care to make sure that you place it centrally, equally spaced between the sides.
add your topper to the outside of the inner flap (you can add this on in a diamond shape or if you would like it square on or want to stamp on your inner flap, thats an option too!)

here is a close up of how the closure works - make sure that before you stick your embellishment or sentiment down that its easy to tuck the inner flap in and pull it out again - I used good thick foam pads for this and played around with it before sticking it down permanently.
one final view to show how it closes:

I hope you found this tutorial helpful and if there's anything you're stuck on, just leave me a comment!

Sunday, June 6, 2010

Masking and white embossing powder

okay am sharing this card I made with a fabulous technique I saw somewhere a while ago and then promptly forgot about it and where I found it!
wanted to make a card with petals which are mainly cream but pink tips and did want a black or grey stamped image to spoil the softness of the colours so stamped the image in clear embossing ink, and sprinkled on some white embossing powder (got the titamium white EP from the purple gerbil on ebay - see link on the bnlog under my retail therapy section).
stamps were from here

... then coloured the image in with twinkling h2o's... cut and mounted the aperture layers one at a time so it was easier to do the matting on the borders, and used the rosebud CB folder on the pale pink.
ribbon is from stash and I have precious little of it left, and want more, so if anyone knows where to get some I would be delighted!!

Friday, June 4, 2010

swaps

just a quick post before we head out into the sunshine for a walk by the seaside (and maybe a 99 with a flake!)
.. a couple of swap cards I sent to fellow crafters...
the first one was meant to be done in April (was just a little busy these last few weeks) and the theme was meant to be easter, so I thought hmm that's been and gone, but I could still use the stamp I wanted to, and make it a bit summery.
papers were freebies from card making and papercraft, flowers have four layers made with one punch - a fiskars blossom shape, leaves cut on the robo and of course one of my favourite penny black stamps..
the sentiment stamp was from an easter set from Darcie's range


this stamp set was using one of the Melanie Muenchinger / Gina K Range which I just keep going back to, as I love them all.
for this card I used one flower stamp and two different leaf stamps and masked the main flower after stamping that, before stamping leaves and the other two flower shapes, coloured in with twinkling H2O's and layered another image of the middle flower to give it a bit more depth, with stickles to finish
some more detail so you can see the layererd centre piece and the colouring

Tuesday, June 1, 2010


just one more Christening card to show you - similar to one I did a couple of weeks ago but this time using a Martha Stewart Zig Zag punch so its not too frilly and just ringht for a boy.
the image is from a Joanna Sheen cd called Baby Love..
.. and some more glue gun dew drops of course - can't help that I am addicted to their shiny nature!