Thursday, September 30, 2010

Autumnal Embossed Wedding Card

The time of year, all the lovely rich colours around and a request to create something different is what inspired this wedding card, made for a special friend to give, and I really enjoyed making it. Its very different from the usual wedding colours and theme, and reminds me of all those beautiful autmumn shades.

I played around with the leaves and the inking for a good while until I was happy that the colour scheme was just right, and would complement all of the white. The names are added using copper embossing powder and a just rite alphabet stamps.

The leaves are die cut from a mixture of quickutz and spellbinders leaf dies and the inks a mixture of adirondak and color box chalk inks; the embossing done with slightly thinner and smoother white card, using a quickutz vine embossing folder.

The border was punched using a Martha Stewart punch, and the card was finished off by placing it in a decorated box.


Wednesday, September 29, 2010

Going golfing with the men!

This one I wanted to share because the image is so popular - it was made using my all time favourite golf image sheet from Craft Creations - it used to take me ages to work out the fiddly levels when it was four of one image on the same sheet and, although I liked the challenge, thats not so good when you're in a hurry to get it done.. so now they have step by step sheets which are easier but also less wastage!!


The wording is done on the pc using a font that I thought resembled writing with bits of 'scattered grass' and nestabilities used to cut the circles, with cuttlebug embossing - the trick is to place the image to cover the overlapped embossed areas, as the embossing folder only covers half of the white top layer of card on this A5 size, but you can work around the size things by placing ribbons and toppers strategically!

Candy Time - Winner ANNOUNCED - Kitty


I thought it was about time I offered some candy again cos, I need to get rid of some stash (running out of space) and its always good to win something, right?!


The card is from payper box, thick enough for A5 base cards and just as nice to layer, with a luxrious pearlised sheen to it.
There are lots of satin bows and tags of fairies and popcorn bear as well as ribbons and gold and silver adhesive sequins which are nicer than peel off lines and on a roll so no wastage.
Have also added some animal themed christmas papers and not in the picture is a cute companions stamp which is a mouse with a banner and sentiments to match, similar to this one:
http://www.crafterscompanion.co.uk/cute-companions-775/stamps-777/crafters-companion-companions-especially-2958.htm

If you would like to win my candy, please leave a comment and make sure to leave your name if you dont have a blog account!!

THANKS FOR THOSE WHO ENTERED - The winner is Kitty - please email me your address Kitty so I can post your parcel to you - chosen by random.org


Tuesday, September 28, 2010

a fishing card


Just wanted to share a masculine card of a fishing nature..

the card is made using a stamp I found on ebay and coloured with twinkling H2O's - tried a different layout rather than placing it centrally on the card, which means you can play around with adding name tags and scrolly embellishments to make it look more celebratory, if you know what I mean.

the scroll shaped embellishments are from nestabilities, and the inking around the image is done with a dauber and adirondack inks with the square left in the square nestability die, which makes a nice white border after the inking is all finished.


Sunday, September 26, 2010

Just Inklined Digi - A Prize!!

...and it seems months and months ago now, but back in July I was lucky enough to guess Jak Heath's next project and win three of the gorgeous Just Inklined Digi Stamps, and i was very excited to be able to pick and choose - there aere a good many fabulous digi's and the lastest one with the girl posting a letter to Santa is a brilliant one, so hop over and take a look here.

the first one I had to have was the Rose Digi, and here is the finished project, an A5 card.


the detail below shows colouring with twinkling H2O's and the oval recess frame, the punched edge was made using a fiskars border/corner punch and the sentiment is from a Just Rite Stamp set and happens to be on my craft desk at the mo.

thanks for looking!

Thursday, September 23, 2010

Sweet Stop Sketch Challenge


I saw ths challenge blog and liked the sketch a lot, but wasnt sure about the colours which i now REALLY like.. here's my contribution to this weeks challenge (see link to the Sweet Stop on the blog links on the right) and this was a sketch challenge using Mustard yellow and deep red, nice autumnal colours too.


I used my just rite flower stamps, borders and sentiments and coloured the suflower with twinkling H2o's, added some embossing and inking and flowers made with a punch and glue dots and some faux stitching too.

Sunday, September 19, 2010

Making it with Meslyn Mid Month challenge

this is officially my second Christmas card, so very glad that Caroline decided on a Christmas theme for this month's challenge, because I need to make a serious start on my cards for that special time of year!


The image is from a set of stamps from Flourishes called Doves and Holly and is a clear polymer set.
The doves were coloured with twinkling H2O's and not too heavily because the stamp is such a detailed one.
I used satin ribbon and the backing papers are digi ones from Bearly Mine Designs which are freebies this months thanks to Donna - please hop over and check Donnas beautiful backing papers, there are some really elegant Christmas designs on the blog.

here is the inside of the card:


Pop over and take part in the challenge here, its a good time to start your special cards!!

Saturday, September 18, 2010

my first scrap layout

as promised, here is my scrapbook layout from last weekend, after I came home to finish it off and do the lettering. my robo isnt playing ball since I downloaded the new drivers, I cant seem to change the cutting speeds, so I did the lettering with funky foam and the hippie chick cubbtlebug alphabet.


This is my first LO, so if there are any obvious blunders, forgive me, but thanks to Charmaine I have a passion for something new and I am sure I can speak for the rest of the ladies in the workshop when I say we had a fabulous time - the time ran away with us but we didnt care, we were having a ball - thanks Char and I know we are going to be doing scrappy layout in a couple of months again, so cant wait for that!!

the flourish border used was from a quickutz cookie cutter border die in case anyone is wondering - its one off my favourites because you can use thwe hole 12'' or you can cut it and make your own shapes

I hope my Gran doesnt see the pic of this layout until she gets it and I just hope it arrives safely - I am sending it all the way to South Africa next week and I know she will treasure it cos my Grandad is no longer with us, and this is such a beautiful picture of a special couple.


Sunday, September 12, 2010

Workshop cards

so here are the workshop cards from yesterday, sorry its a bit late posting, but I was a little tired after the day we had, and just wanted to relax last night.

...this time there are only 5 cards, because we also made a gorgeous layout with help from a very talented scrapbooker called Charmaine - check out Char's blog here!

I still want to do the welded lettering on my robo today, so my LO wont be posted til later or tomorrow! I can see me doing a lot more of them now too. We also had the opportunity to see Char's cricit in action (okay much easier to use than my robo!!) and so everyone was able to personalise their layout at the workshop too, and I am sure this will be the first of many workshops where we can do layouts.

So here are the cards, most had an autumnal feel and I wanted to do some final birthday ones before we head into the halloween and christmas themed projects.

A window card using one of Tracey's Emma images from Fred She Said (these are available in black and white to resize and print, and you can ask for your own sentiment as well as getting the digi kit with general or blank signs OR as pre coloured ones)

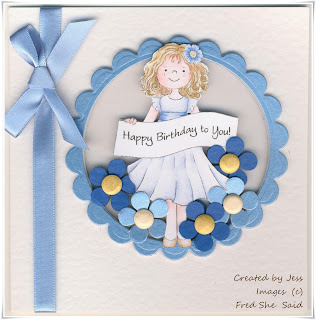
some detailed photos from the side so you can see window which was made by cutting the aperture with nestabilities as well as the acetate and frames with nestabilities too, decorating with punched flowers and card candy.

The dea of where the flowers and figure are placed, means you can hide the sentiment or writing inside the card, and still have the window effect without the need for a tri fold card .. hope that makes sense..


two more mens cards this time:

I decided to use an image I have been longing to use for ages now!! also from Fred She said... and also available as pre coloured or black and white digi images!
We decoupaged the precoloured images and did lots of layering with nestabilities dies.
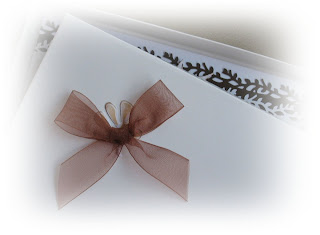
The embossing on the bottom was done with a cuttlebug border embossing folder on pearlised cardstock, so it shows up really well.


The next one has an autumnal feel with the apples and the colours. I found this stamp on ebay and I think its an old PSX one which is retired, just love the PSX images they are very detailed and are just so nostalgic.

We used big n juicy ink pads and a brayer to colour the leaf border which was cut (two strips) using an EK success border punch - nice and messy but great fun, and then we coloured and layered some more!

The next one was made using some of the new lacey circle nestabilities dies, which I cant wait to use again and again on my christmas cards, and some quickutz and spellbinders autumn leaf dies, as well as the spellbinders fancy tags labels (again! I love those so much) and a magnolia tilda stamp.


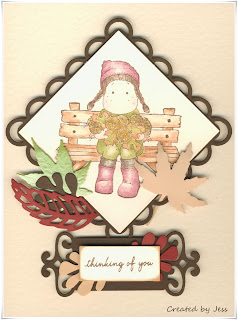
the stamping was done using two stamps, and a masking technique:
  • stamp the tilda onto card stock and onto thin paper
  • cut out the paper version
  • use the paper tilda to cover the stamped cardstock version
  • and finally stamp the bench over that
  • the end result is the fugure sitting on the bench
...the leaves were arranged and threaded throught the lacey squares...

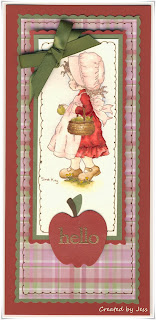
our final card was using a Sarah Kay stamp and also embossed the sentiment in gold embossing powder on the red apple die cut (the die cut is from cuttlekids die from provocraft)


most of the cards in the workshop have been coloured with twinkling H2O's with the exception of the tilda one, which was ocloured using the pencil crayon / sansodor technique.

I hope you enjoyed popping by and email or leave me a comment if you want to know about any of the matyerials or techniques used!