Friday, July 30, 2010

Sizzix and Cuttlebug Wedding Cards

Just a few cards to show you, made mostly with one Sizzix Die called Valentine Wreath, and with Cuttblebug Embossing folders, mostly done in soft shades AND with no figures or people on them for a change!

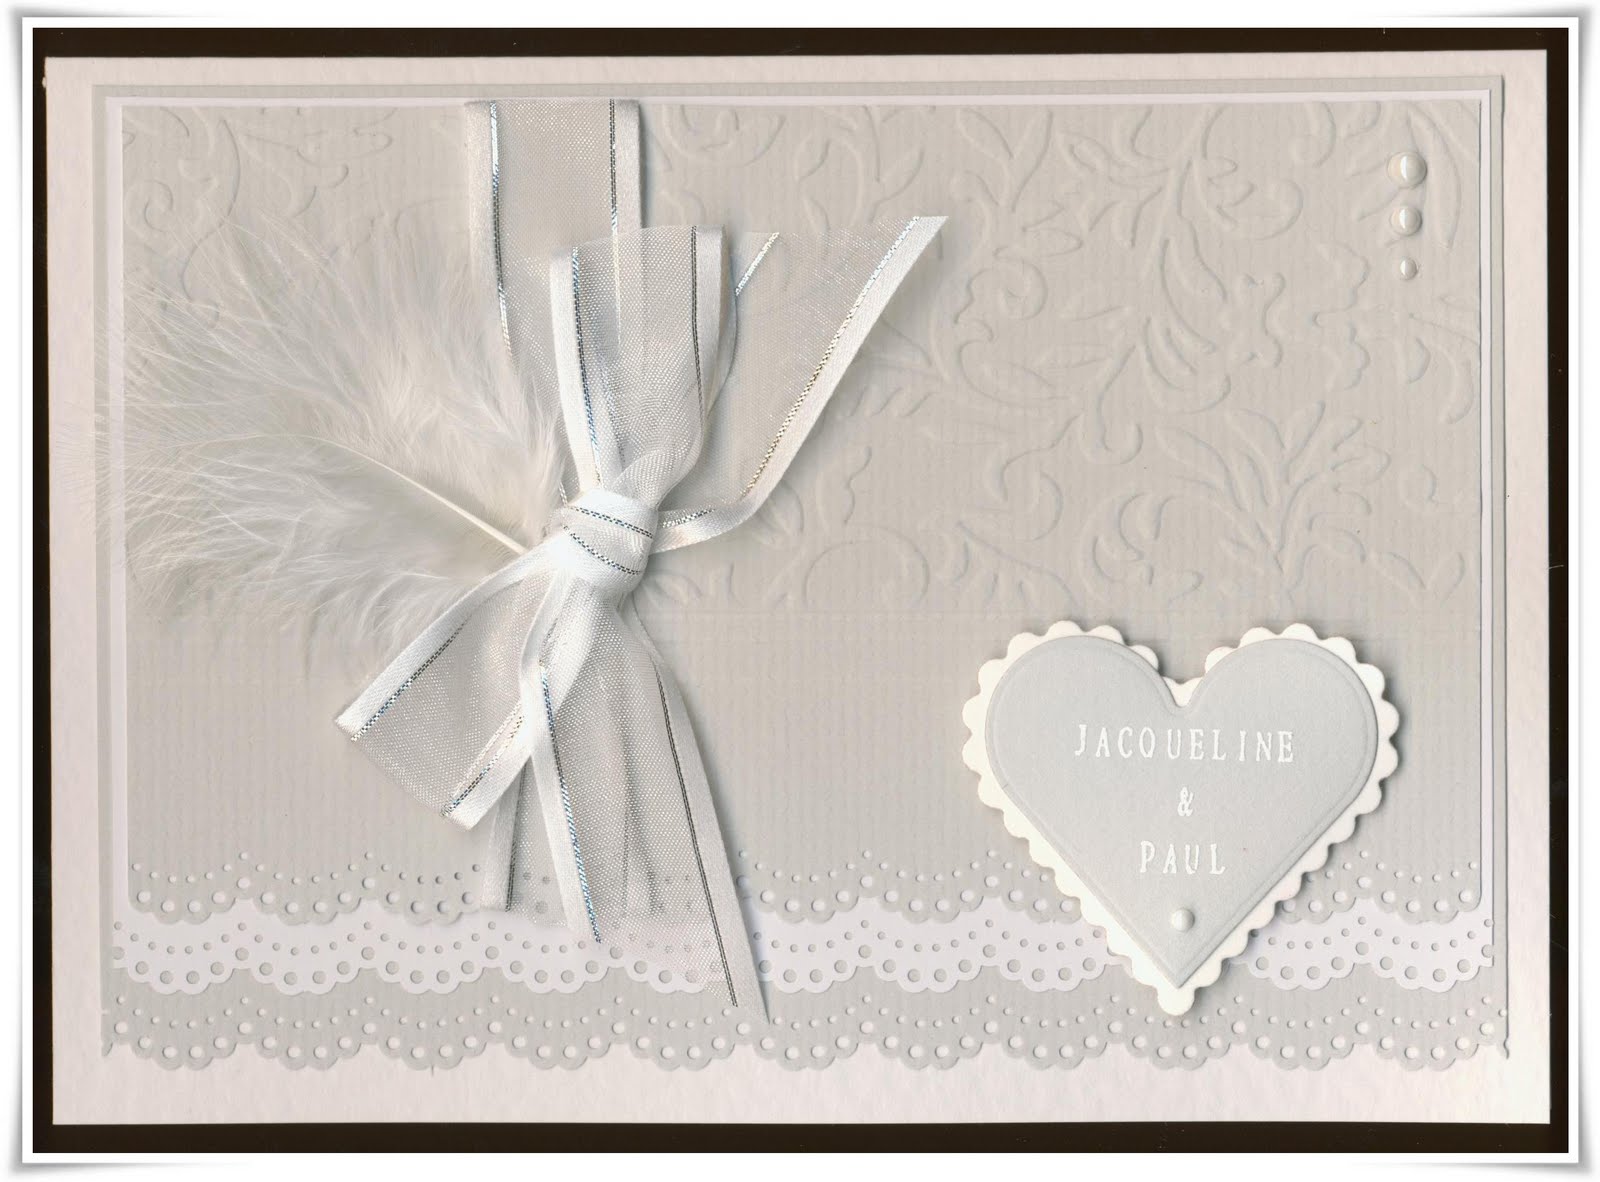
The first is made with a real feather and in very soft muted shades, with pearls and Ribbon and layering.
The heart shapes were cut with the Spellbinders Nestability dies in the plain heart and scalloped heart shapes, and the letter was done with just rite alphabet stamps which were stamped in embossing ink and heat embossed after adding white embossing powder.
The grey card is bazzill but not sure which shade as I have had it a long time..


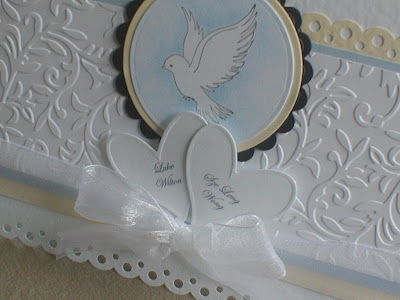
The next two cards are similar in that they use a Whiff of Joy Stamp from their recent wedding collection, the dove one. I stamped and cut the dove from ordinary paper (not card otherwise you cant sponge right up to the outlines) and then stamped the dove onto cardstock.

Holding the cut out paper dove on the top of (or stuck on with eclipse masking paper) of the other stamped version, thereby masking the one underneath, I used a dauber to subtly apply ink from my baby blue memnto ink pad on the one card or cream from my colourbox chalk pads around the dove image, and then took away the masking paper.

The paper punching and embossing is as usual and the hearts positioned behind the tied ribbon are from the centre of the valentine wreath sizzix die and stuck on at various angles with different thicknesses of foam pads. - detail below


I hope you enjoedy looking at these and I have another card coming up in the next couple of days which I am working on for a Wedding Anniversary, its unusual and am sure it will make you smile and its 'different'!

thats all for today..


Sunday, July 25, 2010

Anniversary Cards with Sizzix Heart Wreath


Hello blogging friends, just wanted to share a couple of cards I made with one of my fabourite dies which embosses and cuts at the same time. Its a sizzix die and I was inspired by one of Sue Nelson's cards found here.

The first is for a 35rth Anniversary for my Mom and Dad, and its Coral for 35 years, so I chose coral as my contrasting colour - I used a Martha Stewart punch with this and faber polychromos pencils with the odourless spirits technique to add the colour. some paper piercing was added too

here is a simliar card made with the same die but I added a third colour, the colours were the theme of the couple' s wedding, and on this one the sides were embossed with a cuttlebug floral border embossing folder and a different martha stewart punch was used.

Saturday, July 17, 2010

Meslyn DT Challenge #4

Been bit busy all week, so not many posts, but should be posting some more over the next few days, and to start, here is a card for the latest Making it with Meslyn Challenge.

The theme is pink / girly and glitter and sparkles set by Caroline. I used a Sugar Nellie Stamp called Lola with Flowers which was stamped in brown ink, before being coloured with pencil crayons and the sansador spirit technique.
The flower and flourishes are cut with dies and funky foam, so are nice and thick, but still delicate with the pastel colours.

here is a close up view so you can also see the partial cuttlebug embossing:


Gems and stickles added to finish and the punch used is the fiskars apron lace one.

Wednesday, July 14, 2010

Meslyn DT Challenge no 3

Its challenge time again over at Making it with Meslyn and this months goody bag was nothing short of absolutely delish!! Carolyn has some great new things in the shop and we were given some goodies with which to make something for the coming two weeks' challenge with the theme 'piece of cake'.

there is a fabulous prize up for grabs this month including scalloped card blanks, papers, embellishments, and decoupage sheets from the piece of cake range and trust me they are SCRUMMY!

here is my DT entry for this challenge - pop over to the piece of cake challenge and take part and you will be in with a chance to win some great goodies.

Bumping this post so it stays on top until 14th July


all of the ingredients for this card were from my DT goodie bag, in addition to which I added the blue cream and red card stock and that was it ..
I scalloped the top border with a Stampin up half circle slit punch which I got from ebay - yes its working again (I thought it had stuck but managed to get it going with a bit of sandpaper LOL)

thats it for today, thanks for looking and I appreciate any comments you leave.

Saturday, July 10, 2010

July Workshop


here are the cards from today's workshop - it was a very busy day as we did a lot of colouring and bit of inking and partial embossing etc, and the cards in the end were quite varied.

I have added links wherever I can for you to purchase digi items etc.

NOTE - I have permission from Diane (Di's Digi Downloads) and Tracey (Fred she Said) to use their images on the cards in this workshop. Please pop by and visit their blogs as I am sure you will like what you see, since their digi artwork is fab!

this card is made using a ship stamp which was stamped and coloured with twinkling H2O's and covered with a 'porthole' - the porthole was made by cutting a circle frame with nestabilities and using a brown marker, the 'screws' were added/drawn, and then the copper paper frame 'aged' with distress inks.
The circle frame was then attached to acetate and the window then attached to the ship image with foam pads - the topper was then attached to the wooden background to replicate the inside of a ship, or I hope it does!!

this card is a joy fold card with slightly different dimensions to the original tutorial found here.
the flourish shapes / die is a Quickutz cookie cutter die.
this card was also coloured with twinkling H2O' and the green topper or mini card which is glued to the base, opens and then closes, by being tucked just under the sentiment.


we made just the one wedding card with a new magnolia stamp and the design is clean and simple, the colouring done with pencil crayons and sansador (the mineral spirit pencil crayon colouring technique)
the embossed frame is made with the nestabilities die face DOWN / cutting side DOWN but instead of cutting onto a plate, use the tan rubber mat and it doesnt cut all the way through.

the next two cards were made from Digi Images, you can find on Di's Digi Downloads - I just fell in love with these little animals they are SOOO cute, and I decided to make cards that had straight clean lines and clean pastel colours - they were also coloured with pencil crayons and sansador.

...the Lovable Duckling can be purchased here,


and the Daisy Chain Bunny here.
okay so its raining but the last few weeks' weather has been gorgeous so I couldnt resist making a card with this Stampendous Stamp and its called Girl at Beach a few days ago, with seed beads added to accentuate the sand - they are easy to use and add texture to a card too!
The border is made with a fiskars punch called apron lace, and partial cuttlebug embossing around the sentiment.
last but not least, is this sweet litte girl in a kimono image, from Tracey at Fred She Said here - these are the pre coloured images which I used on a background embossed with a cuttlebug folder, but you can also get matching cherry blossom papers and digi sets to print for backing papers and digi images to colour yourself.


So, all in all it was a productive day and if there's anything I have left out or you would like a link for then just drop me a comment or send me an email.

Tuesday, July 6, 2010

Friendship Card

friendship cards are a great thing to make but didnt want to do flowers again, so this Penny Black stamp called Tea Cozy is perfect! I got some new gorgeous ribbon from Crafty Ribbon a couple of months ago and with the fiskars lace punch it all came together okay..

The image is coloured with twinkling H2O's and the flourishes and labels are cut from spellbinders dies.. think I have covered everything - nothing like cute little mice!!

Thursday, July 1, 2010

some more old favourites...

Its already July I cant believe how the time is flying by and that means its the second half of 2010 - at least the weather is still nice and warm. Well, I said I was going through my stash so here are some more cards using some old decoupage I had which I combined with papers and nestie shapes and sentiments.. hope you like them.
the first two are get well cards
and the last one is a sympathy card or a thinking of you card - the colours are muted so it suits any ocassion really. I used a fiskars border corner punch on this one