Thursday, December 30, 2010

No stamps!

OK so after starting my crafting obsession with decoupage (and still like layering BTW!!), and becoming addicted to stamping, here's a card without any stamping...


just embossing, die cutting and embellishments and some stickles to add bling!
here's a closeup and what I used:
Cuttlebug rosebud folder for embossing
Quickutz flourish cookie cutter die
Nestabilitesd for apertures
Strung pearls, various mulberry roses
McGill punched leaves for foliage

Tuesday, December 28, 2010

Purple Birthday with Gingham

Well its a refreshing change to make something which isn't Christmas themed - I LOVE Christmas, but I enjoy doing other cards as much and using other colours and stamps too after making a lot of Christmas ones!


I got to use my favourite alphabet dies from stash, the Cuttlebug Hippie Chick ones - the dies are quite large but are great for certain cards, like this one as its an A5 one.
The ribbons are from Crafty Ribbons and the gingham paper from Craft Creations, available in 12x12 sheets, the flower die also from a Cuttlebug set with asterisks in it.

Sunday, December 26, 2010

Lily of the Valley Christmas Angels


Just one last Christmas card to share with you, and its one stamped with a Lily of the Valley Christmas stamp (sorry I cant link to their shop at the mo as they are not open over Christmas, but here is their website)

The aperture in the top sheet of white card was cut before embossing, so the embossing stays crisp and the border made with a Martha Stewart punch called Aspen Snowflake, and the punched flakes added afterwards as embellishments.
The innocence of the angels makes this one one of my favourite stamps from 2010!

Saturday, December 25, 2010


Just to say Merry Christmas to loved ones who I wont be with this Christmas, and the special people and friends I have been so fotunate to meet in 2010.

Merry Christmas to you all!

Friday, December 24, 2010

Cuttlebug Partial Embossing Tutorial

I know so many of you have asked for a step by step guide to do this, when I go rambling on about it, so here it is.

Below is the finished card, and the steps to follow will show you how I got there:


I have a cuttlebug, but am sure this can be done with other die cutting machines which have a plate / sandwich system, and if you 'know' your machine, and take it one step at a time adding layers as you go until you get the right pressure, without forcing things through the machine.
Once you have done the first one, I guarantee you will be hooked!


Here is a detailed image of one corner as well so you can see what we will achieve:


Materials Needed:
  • Cuttlebug
  • A B and C Plates
  • Die to cut apertures (or craft knife to cut your own size apertures)
  • Stamp or image which you want to emboss around, for sizing
  • The card stock you want to partially emboss
  • an embossing folder
  • scissors
  • sellotape
Sizing:

Decide on what size die or what kind of aperture you want to cut around your image , so that it fits, as you can emboss over your image, but in this tutorial i have embossed around it.

Cut Aperture:

  • I have taken a C6 size piece of regular 250gsm card stock and cut an aperture (chose C6 as this is roughly the size of the cuttlebug folder) and cut a rectangular aperture in the middle.
  • Once you have cut the first aperture, I cut 9 more (depending on the thickness of your card and if you use mount board you will need less or more layers)
  • the idea here is to make as many to sellotape together, as to resemble the thickness of a B plate.
  • If you don't get the thickness 100% right you can always add another piece of card when embossing at the end, as a 'shim' to get some more pressure / thickness in the sandwich.

Sellotape all the 10 apertures of card together (I usually align all the holes or apertures then trim off the sides before sellotaping together)


Embossing:

  • First stamp your image or emboss it, or mark when you will be sticking down a 3D image or whatever you want to add to the embossed sheet
  • then layer the sandwich as follows:
  1. A plate,
  2. Embossing folder with card stock inside ready to emboss as you usually would
  3. Aperture stack of card you made, placed over the image so you can see the bits you 'don't' want embossed - this whole thing works by embossing only the areas with pressure, so it wont emboss where you have cut an aperture - okay with that??
  4. B plate
  • roll through the bug
  • if the embossing effect isn't strong enough, add another shim of card stock the size of a cuttlebug plate, and try again until you get the thickness you need
End result:
Here is the embossed card stock, and in the middle there is no embossing where the aperture is - I have inked the edges just to make it pop a little more!


Sunday, December 12, 2010

more crackers and cards

So here are the all the colours made so far, as promised, original tutorial found here.

...and some more Christmas cards to show you!

I am making one more embossed design this Christmas, so only one more Christmas to show in next couple of days and then I can start thinking of other themes, and in the meantime these are the last of the more elaborate ones:

Christmas wouldn't be Christmas without a robin, and this one is a cute stamp from Inkadinkadoo. I used a cuttlebug border to emboss the berries and branches and a Martha Stewart corner border combo punch set for the top; coloured with twinkling H2O's and stickles added to make some sparkle.

Gold never photographs or scans well so apologies for the photos, the colour scheme was brown gold red and cream.
... and a side on view to show the layering with foam pads and apertures cut with nestabilities.

this next card is a real cutie!
The stamp is from Serendipity Stamps Inc and the number 1128qcl Seal.
There was minimal colouring in this one, as the stamp just says it all!
The lacey circles and centre diamond shaped die cuts are from Nestabilities dies called Fleur de lys and lacey squares.
The paper is from Craft creations found here (snowflakes on white)


and here is a close-up, so you can see I added lots and lots of stickles!!

The next card is a forever friends one and I still love using these images, especially the Christmas ones.

I used two cuttlebug embossing folders in this one, the holly one for the background and the bubble one to emboss the brown circle for the pudding.

to make the pudding:
  • cut a cream and brown circle the same size, and emboss the brown one.
  • draw custard drips on the cream one and cut out the 'topping' part, ink the edges with a pale biscuit colour and glitter it with stickles gold ice,
  • after which you can glue to the brown circle,
  • add holly leaves cut out of funky foam and gems or dew drops for the berries.

The last card is a Sarah Kay one, also make with a nestabilities die called Snowflake border, and the stamp is called Noel Joy.
the embossing is done with a cuttlebug folder, used twice on an A5 piece of card, and the image is also coloured with twinkling H2O's and glittered.

here is a close-up showing where I added stickles to the embossed frame as well.

Saturday, December 11, 2010

Making it With Meslyn December challenge + DT guest slots


hi everyone, its challenge time at Making it with Meslyn again and the challenge is to 'show us your best'.


I chose my Christmas crackers for this month's theme as I am glad with the way they turned out, better than I expected and I had so much fun sharing them with some more crafty people yesterday!

The prize this month is another £10 from Meslyn Crafts and there is also a massive 20% off all orders at the moment which is fabulous!!

Making it with Meslyn is also looking for Guest DT members for the next 6 months so if you want to enter add DT after your name on your challenege entry

Good luck!

Monday, December 6, 2010

Christmas Crackers


I know I havent posted for a while but the weather froze my mojo as well as everything else outside!LOL

I started making my own crackers a month ago, and after trying and testing different types of paper and ways to tie them, I came up with the following, which I have decided to make into a tutorial.

If you pop by and use the tutorial please leave me a comment / feedback, so I know how you found it, as it was a little bit of work and I would appreciate the feedback!!

Here goes then..
I thought it best to have as much info and as many pictures as possible, hence the long post and they are quite easy and quick to make after the first one!!

To start, your usual tools of the trade - DS tape, Scissors, glue etc and also the following (I didn't add hats or jokes or gifts to my crackers yet, and still deciding on what gifts or delicacies to add!):


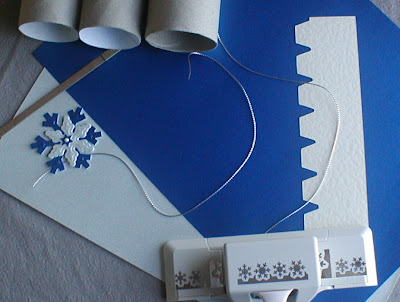
STEP1 gather your materials
  • Two sheets of heavy duty backing paper or shiny pearlescent paper or paper you have stamped images on
  • two lengths of ribbon or cord to tie each end
  • border punch
  • three toilet roll insides
  • cracker snap (found mine on ebay)
  • embellishments to add to the cracker afterwards
  • template for cutting slots where you tie the ribbon so it ties neatly especially if the paper covering is thick (mine is a robo template but you can make your own or buy one here)
  • I used Craft Creations Pearlescent card and paper found here - the card and paper colours match and have a lovely sheen to them, making them ideal for this project
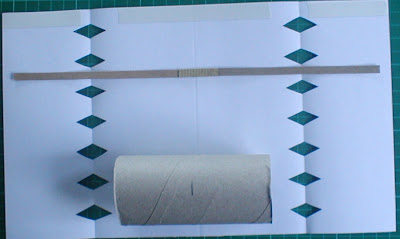
STEP 2 cutting


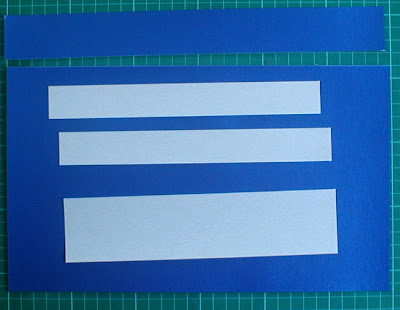
  • Cut about an inch off the length of your A4 piece of paper, the one you would like as your main covering / cracker colour, so it measures 7'' X 11.5''.
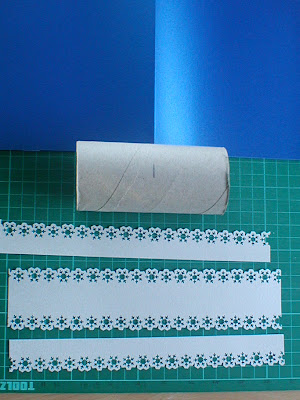
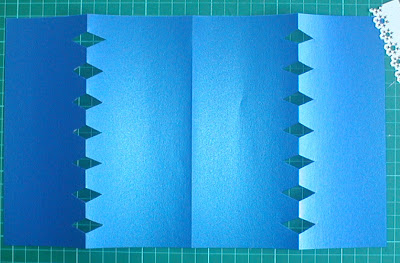
  • Cut strips from your contrasting coloured paper ready to punch borders for the middle and both ends of the cracker
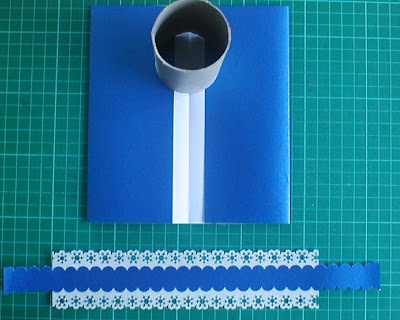
  • Fold the large pice of paper in half, so you can easily centre your cardboard inner tube and make sure your ends are the same width as well

STEP 3 More Folding..
  • Turn the pearlescent paper up so the back faces you and fold each side in towards the middle fold you just created, which:
  • makes guidelines for tying and a neat finish - fold about half an inch away from the centre fold on each side, dont bring both sides right into the middle
  • use your leftover blue strip and cut a straight or decorative centre to the middle white border

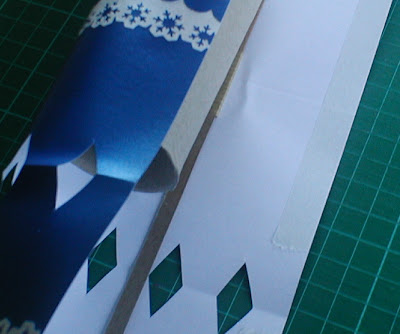
STEP 4 Cutting Diamond shapes for tying

Use a template, or try making your own, or mark upside down V shapes on both folded edges of each cracker end:

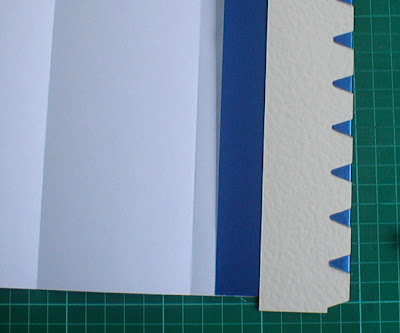
Cut the V shapes with the paper still FOLDED to make the diamond shapes


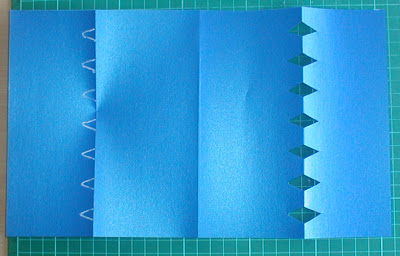
When cut, and the Cracker sides are unfolded, it should look like this:

(note the thicker the paper or card used to cover the cracker the closer the shapes will need to be, since there is more / stronger paper to bring together when you tie, and if you are using thinner paper the diamond shapes need to be further apart so the paper doesnt tear when you tie the ends!)
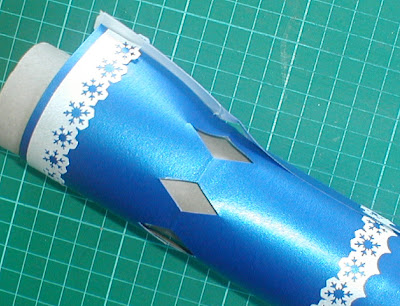
STEP 5 Attaching border decorations

At this point, stick all your borders to the cracker covering, making sure to stick right to the ends for a neat finish


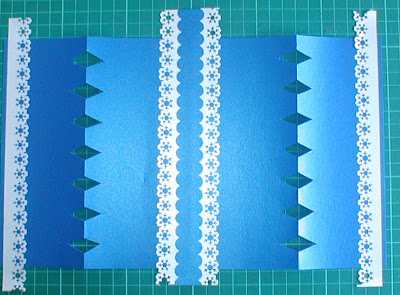
Trim off any excess now too, its much easier than later on and tidier!


STEP 6 Assembly, Filling and Tying
Now we're ready to roll!
  • With your cracker covering face down, and having marked the centre of your cardboard inner tube, you can now match up the paper to the inner, and lie the cracker snap two thirds of the way in from either of the two sides, so the snap is held well in place for pulling
  • place DS tape in the middle and two end sections of one of the inside sides of the cracker covering - check the picture above
  • Peel off the middle one only (its easier this way!)
  • Roll the tube and covering, keeping check that the sides are all matching and attach the middle
  • Insert two tubes on either end to keep the shape of the cracker nice and neat and free from creases while tying ribbon or cord
  • Tie one end
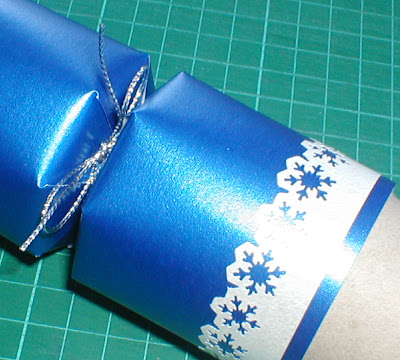
  • ADD YOUR GIFTS and other items at this point
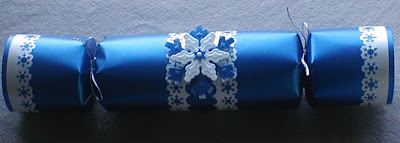
  • Tie the other end


STEP 7 Finishing Touches

Almost done - you can add any embellishments at this stage, and I added a snowflake because I love the whole blue and white theme!


I have some more colours and different crackers to show as have made 6 now and got a little carried away, just waiting for my camera batteries to charge, so pop by again and I will have them up in the next couple of days.

These are great fun to make, and addictive and I hope you find the tutorial useful!

Friday, November 26, 2010

Flourishes Winter Bouquet

I found some of the most gorgeous, traditional stamps from Flourishes in the US and was delighted when I received them a couple of months ago.
I have already made a card with the Dove and Holly Set recently and this is the second one I have done with flourishes clear polymer stamps and have to say they are beautifully detailed and the artwork is stunning, so they are worth every cent spent on them.
This one I chose as a Christmas card, but would also be great for a winter birthday too!
the green mount is made with spellbinders lacey squares and the colouring with twinkling H2O's.

Blue and white snowman

here's one to show you which I made with an image from PC Crafter from a set called Cold hands warm heart found here.


Used an EK Success punch called Swiss cheese cos it reminded me of snowflakes falling, and also embossed the white with a cuttlebug folder after embossing.

The Snowflakes are made with a cuttlebug die called snowflake#2
the sentiment stamp is second hand and has no name on it unfortunately.

Sunday, November 21, 2010

and some more Christmas ones

..some more cards to share with you for my favourite time of year, made this week. I love Christmas, cos I get to use copious amounts of glitter and / or stickles and polar white flowersoft and I LOVE that!

So I have three in one post to show, and there will be more next week provided that the mojo is flowing in the next couple of days!

The first is a snow scene card, which stamp I used on a smaller square one a few weeks ago here. I cant see the name on the stamp but its from Anita's range and is from 2002 (I bought it second hand on ebay)

I coloured the imge with twinkling H2O's and embossed the bottom with a cuttlebug border folder and then added a sentiment which was embossed onto the blue pearlescent card using Purple Gerbil (see link on right hand side bar to ebay shop) white titanium embossing powder.. glittered with stickles and aded some flowersoft to finish..
PS the image is stamped in stone grey stazon, not black, so its a little softer!

This one is in red and white, one of my favourite traditional Christmas colour combinations, is made using a Lily of the Valley stamp, new out this year.
Partial cuttlebug embossing on this one around the image, and more glitter stickles and a cuttlebug snowflake die used for the flakes, and coloured in twinkling H20's again.
I used brilliance moonlight white pigment ink to ink around the red bit on the sentiment.

The last one is a Victorian image from a Joanna Sheen CD and the backing paper on the card is just made for this image I think - if you want to buy this digi paper, then hop over to Bearly Mine Designs, where you can purchase it from Donna as a set called Christmas Joy here.

Friday, November 19, 2010

Kilkenny Hurling card

a HUGE thanks to Di from Di's Digi Downloads, that I was able to make a card which turned out really well considering the image is just purrfect! (sorry couldnt resist that he he!!)
this card is a bit of a comiseration for a Kilkenny Cats fan..
and if you like / following hurling matches, and know what happened this year, you will know what its all about...!

I hope you like it Richard and I hope the Cats win next year!

Tuesday, November 16, 2010

Tina Wenke Colour themed card


here's a different card .. its a Tina Wenke stamped Birthday card for a 90th Birthday but it Offaly colours - green, white and gold.
The embossing is done with a cuttlebug folder (a bit predictable but I love embossing..) and I have used nestabilities to cut the appertures and sentiments parts - the edging on the green is done with scalloped edged scissors.
the paint used to colour the image is twinkling H2O's again and I added gold gems to finish off the sentiment as a tiny bit of stickles added to the image.
the gold doesnt show up very well on the picture, it came out a bit dark, so glad it turned out better than the pic in RL!

Sunday, November 14, 2010

Di's Digi Snowbabes Sleighride Card

Awwww this is such a cutie, I couldn't wait to layer and get colouring when I saw it.
Di thanks for more superb Christmas images, andyou can buy this image here on Di's Digi Downloads blog.


I printed the image on slightly thinner smooth white cards, around 180 gsm and then used partial cutlebug embossing to emboss areound the image which was coloured with Twinkling H2O's.
Brilliance moonlight white pigment ink takes a while to dry BUT is worth the wait as it gives a lovely white edge on matt or pearlescent card and I added pearls and stickles and flowersoft for snow and sparkle!
The scallops are made with a stampin up punch.

more Christmas cards

.. couple more christmas makes to show you all, hope you like them... internet slow to upload these for some reason?!

these couple of cards are very traditional and simple in design, but I like them all the same.
The first is a nativity card which is in white and navy (I did one last year in cream and navy and like both colour schemes now)
the image is coloured with twinkling H2O's and the punching is an EK sucess deep edger punch which does not like heavy card so it was very hard work.

The sentiment stamp is an old one I bought second hand as is from Hero Arts and the image is an Inkadinkado Stamp.


The next card is made with a Joanna Sheen CD called Victorian Christmas (the image and the backing paper are from the CD).
I used Craft Creations Gloss coated paper to print on - its cheaper than photo paper and doesnt disintegrate on the edges when you use a craft knife, is easier to cut the detail AND its not too glossy and easy to curl (PS Craft Creations say you need to see what printer you have to see if its compatible with that paper - check out their forum for more info)

The berries are made with glue gun dew drops coloured with melon colour alcohol inks and the snowflake is cut from a nestabilities die, the greenery is a McGill fine fern punch.

thats all for now!

Special Lily of the Valley Christmas Card

I have to make start on my Christmas cards, and nowhere better than the extra special ones, so here's one for parents.
Its a stamp I got from Lily of the Valley called Bringing Gifts and layered up well so it belongs in a box which can be decorated or used to actually post the card in.
The card stock on the card front was embossed with a cuttlebug folder and the blue layer cut with scallop edge scissors.. lots of stickles and flower soft too!
The snowflakes are from a cuttlebug die with three different flakes on it - I have used it time and time again and can recommend it.
The colouring was done with my favourite medium, twinkling H2O's!


The picture isn't great cos my camera batteries were low, but there's a closeup below:


If you look carefully, you can see the metal bells that tinkle when you shake them and also the strung pearls which is my newly found favourite embellishment at the moment so expect to see some more projects with those pearls on them!