I know so many of you have asked for a step by step guide to do this, when I go rambling on about it, so here it is.
Below is the finished card, and the steps to follow will show you how I got there:

I have a cuttlebug, but am sure this can be done with other die cutting machines which have a plate / sandwich system, and if you 'know' your machine, and take it one step at a time adding layers as you go until you get the right pressure, without forcing things through the machine.
Once you have done the first one, I guarantee you will be hooked!
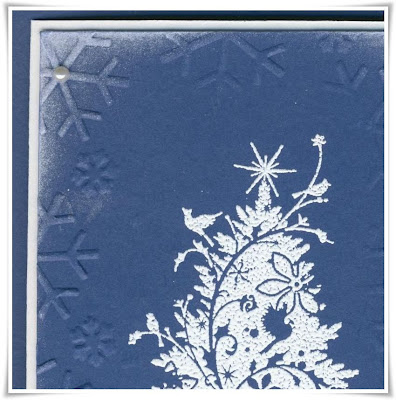
Here is a detailed image of one corner as well so you can see what we will achieve:
Below is the finished card, and the steps to follow will show you how I got there:

I have a cuttlebug, but am sure this can be done with other die cutting machines which have a plate / sandwich system, and if you 'know' your machine, and take it one step at a time adding layers as you go until you get the right pressure, without forcing things through the machine.
Once you have done the first one, I guarantee you will be hooked!
Here is a detailed image of one corner as well so you can see what we will achieve:

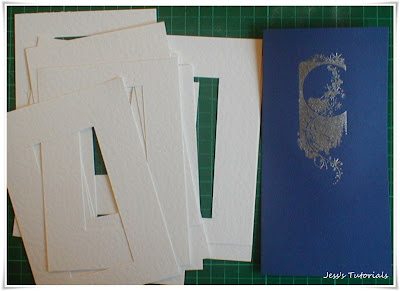
Materials Needed:
 Decide on what size die or what kind of aperture you want to cut around your image , so that it fits, as you can emboss over your image, but in this tutorial i have embossed around it.
 Sellotape all the 10 apertures of card together (I usually align all the holes or apertures then trim off the sides before sellotaping together)

Embossing:

- Cuttlebug
- A B and C Plates
- Die to cut apertures (or craft knife to cut your own size apertures)
- Stamp or image which you want to emboss around, for sizing
- The card stock you want to partially emboss
- an embossing folder
- scissors
- sellotape
 Decide on what size die or what kind of aperture you want to cut around your image , so that it fits, as you can emboss over your image, but in this tutorial i have embossed around it.
Cut Aperture:
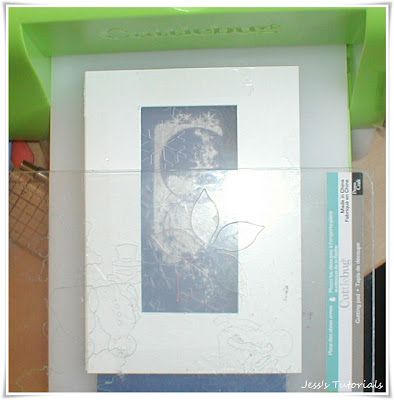
 I have taken a C6 size piece of regular 250gsm card stock and cut an aperture (chose C6 as this is roughly the size of the cuttlebug folder) and cut a rectangular aperture in the middle.
- Once you have cut the first aperture, I cut 9 more (depending on the thickness of your card and if you use mount board you will need less or more layers)
- the idea here is to make as many to sellotape together, as to resemble the thickness of a B plate.
- If you don't get the thickness 100% right you can always add another piece of card when embossing at the end, as a 'shim' to get some more pressure / thickness in the sandwich.

 Sellotape all the 10 apertures of card together (I usually align all the holes or apertures then trim off the sides before sellotaping together)
Embossing:

- First stamp your image or emboss it, or mark when you will be sticking down a 3D image or whatever you want to add to the embossed sheet
- then layer the sandwich as follows:
- A plate,
- Embossing folder with card stock inside ready to emboss as you usually would
- Aperture stack of card you made, placed over the image so you can see the bits you 'don't' want embossed - this whole thing works by embossing only the areas with pressure, so it wont emboss where you have cut an aperture - okay with that??
- B plate
- roll through the bug
- if the embossing effect isn't strong enough, add another shim of card stock the size of a cuttlebug plate, and try again until you get the thickness you need
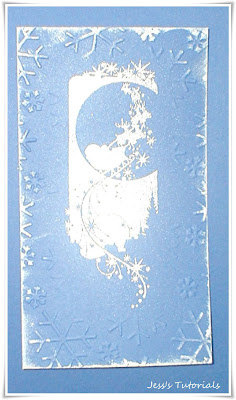
Here is the embossed card stock, and in the middle there is no embossing where the aperture is - I have inked the edges just to make it pop a little more!

Another great tutorial Jess
ReplyDeleteDankie Jess
ReplyDeleteDis wonderlik, ek gaan dit vanaand probeer! :o)
xx